Thursday, October 31, 2013

Easy Shredded Beef

 
Paleomg
5.0 from 10 reviews

Ingredients
  • 2-3lb sirloin steak (I bought it because it was on sale–buy whatever beef is cheap)
  • 1-2 large yellow onions, sliced
  • ½ cup chicken or beef broth
  • 1 teaspoon salt
  • 1 teaspoon garlic powder
  • ½ teaspoon paprika
  • ½ teaspoon black pepper
  • ¼ teaspoon white pepper
  • ¼ teaspoon chili powder

Instructions
  1. Pull out crock pot.
  2. Put meat and broth in pot.
  3. Put onions on top of meat.
  4. Put spices on top of meat and onions.
  5. Cover and cook on low for 8-10 hours.

Wednesday, October 30, 2013

Flax bread

http://www.youtube.com/watch?v=lwtEE7N-Cik

Here is the recipe i use. For one thick slice to be sliced into two.

5 tblspns of ground flax seed or flax flour.
1 egg,
1 tblspn of honey,
2 tblspn of water,
1 tblspn of cinnamon or ginger,
1 tea spoon of baking ''powder''.
1 teaspoon of salt,

mix in bowl, pour into tupperware greased with oil or coconut oil.
Put in microwave for 2 minutes.
Let cool, then slice into 2 parts.
Almond butter spread recommended.

Flax seed tortilla or wrap

http://www.youtube.com/watch?v=n5UtbGQ9c6Y

1 1/2 Cups ground organic golden flax seed
Dry substance for rolling ( organic kudzu starch, coconut flour, arrowroot powder etc...)
1 Tbs organic oil
1/2 tsp organic cumin (optional)
Filtered water

Caesar dressing

http://forum.whole9life.com/topic/14078-caesar-salad-dressing-tips-or-recipe/

I always make my own caesar dressing. I never measure anything. Usually I do the juice of 1 lemon, then add enough olive oil to have about half again as much oil as lemon juice (so like 1/4c. juice to 1/3 c. oil, or 1/2c. juice to 3/4 c. oil). Then I toss in 1 or 2 garlic cloves (I chop them first or else there are big chunks) then like 4-6 anchovy fillets or about a tablespoon of anchovy paste, an equal amount dijon mustard (without sugar or wine), and salt and pepper. Then blend it in the blender. If you're not doing whole30, you can add about 1/4c. parmesan cheese to it.


Traditional caesar dressing has anchovies in it, but you can buy store-bought versions that don't have it. I don't think it's caesar dressing without them though.

Pineapple-Avocado Salsa

http://stupideasypaleo.com/2013/01/06/pineapple-avocado-salsa/


IMG_3655
Sometimes I get bored of regular salsa, and I’m not one to buy fruit at the market very often – I just don’t fancy it all that much, unless we’re talking about berries in season. Lately, I’ve made a couple of fruit salsas to brighten up some otherwise heavy winter dishes. It’s easy to switch out ingredients, so if you don’t like pineapple then try mango or papaya, for example. This recipe made about 5 cups of salsa and keeps well for 1-2 days.
Ingredients:
  • 1/2 of a fresh pineapple
  • 1 avocado
  • 1 large tomato
  • 1 jalapeño pepper, red or green
  • 1/2 of a red bell pepper
  • 1/2 of a red onion
  • 1/2 of a cucumber
  • Juice of two limes
  • Large handful of cilantro
  • Sea salt to taste
  • Sprinkle of cinnamon
Directions:
1. Dice the pineapple, avocado, tomato, bell pepper, onion and cucumber into roughly the same sized pieces. Add to a large mixing bowl.
2. Remove the seeds (or leave them in if you like things spicy) and inner white ribs from the jalapeño pepper. Dice finely. Add to the bowl and then go wash your hands so you don’t get capsacin in your eyes. That would be ouch.
3. Chop the cilantro and add the juice of two limes to the mixture.
4. Add salt and a sprinkle of cinnamon to taste.
5. Let the salsa sit at room temperature for at least 30 minutes to let the flavors combine. This goes great with pork, chicken or fish.

Apple Coconut Pudding

http://stupideasypaleo.com/2011/11/05/apple-coconut-pudding/


photo-175One of my favorite things to do while driving is listen to Robb Wolf’s Paleo Solution Podcast. While trying to catch myself up on back episodes, somewhere in the realm of episode 45-ish, I heard former co-host Andy Deas describe a dessert that really caught my attention because it sounded, well, amazing. And easy. And Paleo. So, while I can’t take credit for this creation, here is my take on Andy Deas’s pudding. Bon appetite!
Ingredients:
  • 1 can full-fat coconut milk (look for one with as few ingredients as possible)
  • 2 apples (I used one Jonagold and one Fuji), peeled and chopped
  • 1 vanilla bean*
  • 2 Tbsp. coconut oil
  • 1/2 tsp. cinnamon
Directions:
  1. Pour coconut milk into a small saucepan. Add chopped apples, coconut oil, and cinnamon.
  2. Halve the vanilla bean and scrape the tiny black seeds of yumminess out. Add to the saucepan.
  3. Simmer for about 30 minutes until the apples are soft.
  4. Puree in the blender until smooth.
  5. Refrigerate until chilled and the pudding is set.
*When I was in Bali, I bought a grip of vanilla beans at the Ubud public market. I treasure them because I bought about 500 grams of vanilla bean pods for roughly $10 American. This is ridiculously inexpensive. If you don’t have any vanilla beans, you can substitute with 1 tsp of pure vanilla extract (but it won’t be as tasty, in my opinion) :)

Tuesday, October 29, 2013

Coconut Flour Tortillas

How to Make Coconut Flour Tortillas!

Happy Thursday Everyone!
Today I have an extra special treat for you :)  My hubby was nice enough to film me for a little tutorial on how to make coconut flour tortillas.   My lovely Sammy struggled with these so I thought I’d demonstrate!
  • This recipe is from Paleo Comfort Foods.  It’s probably my favorite Paleo cookbook and has helped me make many a delicious meal, they deserve all the credit as I mention in the video.  It’s my hubby’s favorite too because he’s from Mississippi and can still enjoy some Southern favorites, Paleo style!.
http://www.youtube.com/watch?v=7SlBUbYrdbc&feature=g-upl
Coconut Flour Tortillas:
8 egg whites
1/4 cup coconut flour
1/4 teaspoon baking powder
1/2 cup water
Coconut oil
1/4 tsp salt
Whisk all the ingredients together and preheat a nonstick pan with some coconut oil.  Pour about 3 tbsp of mixture into the pan at an angle and swirl around.  Once golden brown, flip.  Make sure that they’re really golden or they’ll rip.  These rock, they held up when they were loaded and taste ah-mazing.
Live to Thrive,
Lauren

Sites

http://stupideasypaleo.com/recipe-index/

The Secret to Homemade Mayo? Patience.


Updated September 10, 2012: New how-to video! The vid should help clear up any confusion about how easy it is to make your own mayo. YAY! Also, be sure to read the comments; there are some great suggestions for how to use a stick blender. I’ve kept my recipe focused on a traditional blender or food processor so you don’t need a special gadget, but if you already have a stick blender, you’re good to go.

Neither the ingredients nor the technique for homemade mayo are unusual or difficult – but mixing up a batch does demand, at least for me, an extraordinary amount of patience. The payoff is worth it: light, silky, flavorful, healthy mayo you can use in salads or on top of grilled meat.
This recipe is from the Fannie Farmer Cookbook, circa 1965, so it’s pretty old school. Julia Child recommends mixing by hand. I prefer the blender; you can also use an electric mixer on a low to medium speed.
The magic of mayo is that it’s an emulsion: the oil and egg+lemon juice create a colloid (hello, fifth grade science!). You don’t need to understand all the science, but there are a few things to keep in mind if you want to be successful. I’ve had many, many mayo FAILs*… here’s what I learned to make it just about perfect every time.
1. Your ingredients must all be at room temperature; the egg, oil, and lemon juice want to mingle in a cozy embrace. UPDATE (June 7, 2010): I just made a fresh batch and I cannot stress this whole “room temperature” thing enough. I let my egg and lemon juice sit on the counter top for about 4 hours before starting the blender process, and my mayo came out perfectly, dreamily creamy (see photo below).
2. Take your time. And then go slower than that.
3. Look at the expiration date on your eggs. Add about a week. Write that date on the lid of your storage container so you know when to toss your mayo (if it lasts that long).
4. Do not use expensive, fancy extra-virgin olive oil; the olive flavor is overpowering. I use the grocery store brand “light tasting” olive oil. It barely tastes like olives which is not so good for green salads, but is awesome for mayo. (You might try Filippo Berio or Bertoli.)


Homemade Olive Oil Mayo

Ingredients:
1 egg
2 tablespoons lemon juice @ room temp
1/2 teaspoon dry mustard
1/2 teaspoon salt
1/4 cup plus 1 cup olive oil (light, not extra virgin) @ room temp
Directions:
1. Place the egg and lemon juice in a blender or food processor. Let them come to room temperature together, about 30-60 minutes. Add the dry mustard, salt, and  1/4 cup of the oil. Whirl until well mixed – about 20 to 30 seconds.
THIS IS THE IMPORTANT PART!
2. The only remaining job is to incorporate the remaining 1 cup oil into the mixture. To do this, you must pour very slowly… the skinniest drizzle you can manage and still have movement in the oil. This takes about three minutes or so. Think about three minutes during a WOD; it’s a fairly long time. Breathe. Relax. Drizzle slowly.
If you’re using a blender, you’ll hear the pitch change as the liquid starts to form the emulsion. Eventually, the substance inside the blender will start to look like regular mayonnaise, only far more beautiful. Do not lose your nerve and consider dumping! Continue to drizzle.
If your ingredients were all at room temperature and you were patient, you will be rewarded!


What To Do If You Experience a Mayo FAIL

If something goes kafluey, the emulsion will “break” and you’ll be left with a jar filled with a quasi-emulsion with the consistency of, say, commercial salad dressing. DO NOT DESPAIR! It can be saved. Pour the liquid into a storage container and place it in the coldest part of your fridge. Wait a few hours (again, with the patience!), then stir vigorously. It will be slightly less thick and creamy than the full emulsion, but still delicious and useful for salads: egg salad, tuna salad, cucumber salad, etc. It will not, however, be spreadable – but we don’t care about that anyway because who among us is still eating sandwiches?!
True story: The mayo in my fridge right now is this “compromise” mayo, and I’ve eaten tuna salad made with it for three days running. At my parents last weekend, I made a batch that was PERFECT: fluffy, silky, spreadable (although we did not spread it anywhere). This stuff is amazingly delicious drizzled (fail) or dolloped (perfect) onto grilled meat.
Here’s the cucumber salad my mom taught me how to make: cucumbers, a splash of vinegar, homemade mayo, onions, parsley, garlic powder, salt, and pepper. (Find the recipe in Well Fed: Paleo Recipes For People Who Love To Eat.)

More recipes that include homemade mayo…

“You’re The Top” Tuna Salad
Firecracker Tuna Salad
Tropical Chopped Salad
Fiesta Tuna Salad
Deconstructed Gyros
Creamy Italian Dressing
Southwestern Cumin-Lime Dressing

Dairy Free Lemon Pudding

Mar 3, 2013


Dairy-free Lemon Pudding (132)

This dairy-free, low-fat lemon pudding is a thing of dreams! It's bold in flavor and richness but not in calories and is made with just 6 simple ingredients, including one you would never imagine...

Cauliflower! Crazy? I know!


Dairy-free Lemon Pudding (94)

Please welcome today's guest poster and holistic nutritionist, Leanne Vogul of Healthful Pursuit.

Hi Everyone, I'm pretty excited to be sharing this recipe with you today but first, let's chat about dairy! Many of us are allergic to it, sensitive to it, or have developed a love hate relationship with it. We eat, we enjoy, our stomachs hurt, our complexion suffers, but we just can't imagine a life without the good stuff. Taking the dairy-free lifestyle for a test drive or committing to it because of sensitivities can be a challenge... but it doesn't have to be this way! After a decade of being dairy-free and learning what it takes to thrive on the diet, I created the Done with Dairy Toolkit a (free) guide to living dairy-free with loads of dairy-free recipes and health tips from yours truly. When I'm in a crunch and need some dairy-free inspiration, I turn to the toolkit and my problem is solved!

One of my favorite tricks to making a healthy, dairy-free, Skinnytaste approved dessert is to use cauliflower in place of thick creams and added starches. I know what you're thinking, 'cauliflower in dessert?' YES! If you flavor it just right; with things like vanilla extract, lemon or orange zest, chocolate or citrus juice, you do not taste the cauliflower one little bit. All you have is smooth, creamy, sweet goodness. Skeptical? I have just the recipe that will prove that dairy-free doesn't mean that you have to be gnawing on cardboard, or giving up your favorite low-fat treats. This pudding is impressively low in fat, rich in flavor, highly creamy, and under 130 calories per serving. Crazy, right? Let's get right down to business!  

Important Notes from Leanne – 

Make sure you weigh your cauliflower or, if you don't have a scale, only roughly chop the florets, measure and then cook.

If you do not have a powerful blender like a Blendtec or Vitamix, opt to finely grind your cauliflower before cooking so that it is easier to puree.


Dairy-free Lemon Pudding (103)

Leanne Vogel is a holistic nutritionist and the girl behind the healthy living blog, Healthful Pursuit. Whether you're sensitive to dairy, gluten, soy, eggs, grains, or sugar, or are just interested in eating healthy, Leanne's fun and simple healthy recipes; of which she has more than 550 on her blog, are a great resource for everyone.

Dairy-free Lemon Pudding
www.skinnytaste.com
Servings: 2 • Serving Size: 2/3 cup • Old Points: 2 pts • Points+: 3 pts
Calories: 127.5 • Fat: 2 g • Protein: 4 g • Carb: 25 g • Fiber: 5 g • Sugar: 13.5 g
Sodium: 142 mg


 Ingredients:
  • 3 cups (350 grams) of roughly chopped cauliflower
  • 1 cup unsweetened almond milk
  • 2 tablespoons sugar  or use stevia
  • 2 teaspoons pure vanilla extract
  • zest from 1 large lemon
  • 1/4 cup freshly squeezed lemon juice

Directions:

Dairy-free-Lemon-Pudding2-main

Add cauliflower, almond milk, sugar, extract and zest to a medium sized saucepan. Bring to a boil on medium-high heat, uncovered. Once boiling, reduce heat to a simmer and cook uncovered for 5-7 minutes, until cauliflower is very soft. Remove from heat.

Add in lemon juice and pour into the bowl of your food processor or blender. Blend on high for 1 minute, or until very smooth. Pour into a clean bowl and allow to cool at room temperature. Cover and refrigerate overnight, for at least 18 hours. Refrigeration helps the bold lemon flavor subside and really transforms this pudding. Do not skip this step

Sunshine Sauce

from Mel

Makes enough for 2 people to dip a serving of glorious grilled meat and some veggies

Ingredients:
2 tablespoons lime juice
1 clove garlic, minced (about 1 teaspoon)
1/2 teaspoon crushed red pepper flakes
1 tablespoon coconut aminos
1/4 teaspoon powdered ginger
1/2 teaspoon rice vinegar
1/4 cup sunflower seed butter
dash ground cayenne pepper (optional)
1/4 cup coconut milk
Directions:
1. Place all the ingredients except the coconut milk in the bowl of a food processor and whirl until well blended.
2. Scrape down the sides of the bowl with a rubber scraper, then add the coconut milk. Process until it’s blended and smooth. Store covered in the fridge.

Saturday, October 26, 2013

Roasted Vegetable Cabbage Rolls

Turkey & Roasted Veg Cabbage Rolls (26)

 
Author: 
Allergens: Gluten-free, Dairy-free, Sugar-free, Yeast-free, Corn-free, Grain-free, Nut-free, Egg-free
Prep time: 
Cook time: 
Total time: 

Serves: 6
 

Lean and clean cabbage rolls made with roasted veggies, homemade marinara and ground turkey. No grains!
Ingredients
Roasted Vegetables:
  • 1 yellow onion, sliced
  • 1 medium eggplant, cubed
  • 1 zucchini, cubed
  • 1 red bell pepper, roughly chopped
  • 1 yellow bell pepper, roughly chopped
  • 2 carrots, roughly chopped
  • 1 parsnip, roughly chopped
  • 2 garlic cloves, minced
  • 2 teaspoons extra-virgin olive oil
  • ½ teaspoon dried thyme leaves
  • ¼ teaspoon dried basil leaves
  • ¼ teaspoon dried oregano leaves
Remaining Ingredients:

Instructions
  1. Preheat oven to 425F
  2. Combine all roasted vegetable ingredients on a baking sheet and toss until all veggies are coated in oil. Roast for 30 minutes, rotating veggies halfway through. Set aside.
  3. Meanwhile, remove the core from the cabbage (images below). To do this, score a square into the bottom of the cabbage to remove as much of the core as possible.
  4. Fill a large pot with water and bring to a boil. Place cabbage in the water and cover with a lid. Continue to boil and cook for 6-7 minutes.Lift the cabbage from the water with tongs or two spoons and allow to drain in a colander. Begin to remove leaves carefully. When you get to the layer of inner leaves that are still a bit crunchy, add back to the water and blanch for an additional 3-4 minutes. Set aside.
  5. Meanwhile, add turkey to a pan and cook over medium heat, rotating often. Set aside once grounds are about ¾ of the way cooked.
  6. Change temperature of the oven to 375F and pour 1 cup of marinara on the bottom of a shallow casserole dish.
  7. Combine 1 cup of marinara with roasted vegetables and turkey. Stir to combine.
  8. Taking one cabbage leaf at a time, cut out the stem of the leaf (image below) and scoop about ½ cup of the turkey mixture onto the far end of the leaf. Roll up and place (stem side down) in the prepared casserole dish. Repeat with remaining leaves.
  9. Once complete, pour additional 1 cup of marinara on the top of the casserole and bake; uncovered, in the preheated oven for 40 minutes.
  10. Remove from heat, allow to sit for 5 minutes and serve.

Notes
I used the marinara recipe that I linked to above but used just 2 teaspoons of olive oil and omitted the red wine.


This may look like an overwhelming recipe, but I assure you, it’s not. Begin by getting your mix of roasted vegetables in the oven. Once that’s done, it’s smooth sailing!
You’ll want to remove the core from the cabbage as I’ve show below. Once that’s done you can set that baby in boiling water and let it sit for awhile. Alternatively, some suggest throwing the cabbage in the freezer overnight then letting it thaw the following day. Had I planned this recipe far in advance I totally would have done that instead. But I didn’t so blanching was my method of choice.
cabbagerolls1
Now, you can skip slightly cooking the meat. I like my cabbage rolls a bit crumbly (I think it’s a texture thing). Also, if you just slightly cook the meat you won’t have to cook the cabbage rolls as long… and I like that! Doesn’t have to be fully cooked, just about 3/4 of the way will do the trick and add good flavor.
cabbagerolls2
Once the cabbage is complete, let it cool down slightly in a colander.
Then remove the leaves and place on a plate.
cabbagerolls3
Combine the veggies, homemade sauce or you could just use any ‘ol store-bought pasta sauce. Be sure to look for a sauce that doesn’t have sugar. There are loads of them surprisingly.
Turkey & Roasted Veg Cabbage Rolls (48)
Remove the stem from the cabbage with a little knife, then add the mixture.
Roll that baby up and place in your casserole dish.
cabbagerolls4
Once you’ve made all 12 rolls, cover with sauce and place in the oven.
Turkey & Roasted Veg Cabbage Rolls (41)
If you’ve chosen to pre-cook your meat, cook for 40 minutes. If you’ve chosen to add the raw meat to the roasted vegetable mixture the rolls will need about 2 hours. Now, can you see why I precooked? 2 hours is just too long for this lady!

Friday, October 25, 2013

Thursday, October 24, 2013

Easy Paleo Ghee Hollandaise Sauce

http://stupideasypaleo.com/2013/07/06/easy-paleo-ghee-hollandaise-sauce/


DSC_0779 Hollandaise is one of those sauces to splurge on, perfect for a special brunch or a party with friends. I personally think a Tuesday is reason enough to make one, but that’s up to you to decide. I’m giving you two methods to make the Hollandaise – the blender is faster than the double boiler – but they both rely on the scientific concept of an emulsion. 
[Science alert: Emulsions are a type of mixtures where you force two liquids that normally wouldn't go together to mix. Mayo and vinaigrette are  other examples of emulsions. The key to an emulsion is to add the fat - the ghee in this case - very slowly while blending or whisking so the emulsion won't "break" or separate. You must be patient. Smile. Breathe. Hum your favorite tune.]
DSC_0771 I used OMghee’s Ghee for this recipe because it’s high-quality grass-fed organic butter that’s already been clarified, which is normally how you’d make Hollandaise. The result’s rich and buttery and ah-may-zing. YUM. It’s easy to double this recipe for a larger crowd.
Ingredients:
  • 1/2 cup melted ghee
  • 2 egg yolks
  • 1 Tablespoon lemon juice
  • Pinch of salt
  • Pinch of cayenne pepper or dash of hot sauce
Directions for blender method (faster, fewer dishes):
  1. Gently melt the ghee in the microwave. It shouldn’t be boiling hot.
  2. Place the egg yolks, lemon juice, salt and cayenne pepper in the blender or Vitamix. DSC_0745
  3. Start the blender on low and run for about 30 seconds. Now…SLOWLY drizzle the melted ghee into the blender through the hole in the the lid. You must go slow or the emulsion will separate and get soupy.
  4. Once all the ghee is added and the Hollandaise has thickened, you’re done. Scrape it out and use on eggs, roasted veggies, a juicy steak…whatever your heart desires.  DSC_0746
  5. Will keep for a couple days in the fridge though it will harden when it cools. Very, very gently warm in the microwave if desired. If you nuke it, the egg yolk will cook.
Directions for the double boiler stovetop method (takes longer, more dishes):
  1. Gently melt the ghee in the microwave. It shouldn’t be boiling hot.
  2. Place a small sauce pan on the stove with a very small amount of water at the bottom (less than an inch). Heat until simmering. Turn the heat to low.
  3. In a small bowl (I prefer glass) that the bottom fits into the sauce pan, whisk the egg yolks and lemon juice until the yolks get pale and frothy.
  4. Now put the bowl into the sauce pan. Voila! Double boiler.
  5. With the heat on low (LOW), whisk the egg yolks while SLOWLY drizzling the melted ghee into the bowl. Go slow or your emulsion will separate.  DSC_0771
  6. Once all the ghee is added and the Hollandaise has thickened, you’re done. Remove the bowl from the saucepan and whisk in the salt and cayenne. Serve over eggs, roasted veggies, a juicy steak…whatever your heart desires.
  7. Will keep for a couple days in the fridge though it will harden when it cools. Very, very gently warm in the microwave if desired. If you nuke it, the egg yolk will cook.

Lemony Herb Sauce

http://stupideasypaleo.com/2013/05/31/lemony-herb-sauce/

   
DSC_0479This sauce got invented to accompany some awesome beef & lamb kofta (meat on a stick) that I made recently. All I can tell you is to hold onto your hat because it packs a wallop of flavor…the brightness of the lemon, the freshness of the herbs and a bit of texture from the pistachios are perfect. I’m typing this and my mouth is literally watering just thinking about it.
It’s versatile enough to drizzle over really any kind of meat or fish and even fresh veggies. YUM!
Prep time: 5-10 min     Cook time: 0 min    Makes: ~3/4 cup
Ingredients:
  • 2 Tbsp parsley, chopped
  • 2 Tbsp mint, chopped
  • 1/4 cup pistachio nuts, chopped
  • 1/4 cup lemon juice (about 1 lemon)
  • 1/4 cup Kasandrinos Extra Virgin Olive Oil
  • 1/8 tsp sea salt
Directions:
  1. Chop the parsley, mint and pistachios. Combine in a small bowl with the sea salt.
  2. Squeeze the juice from one lemon (~1/4 cup) into the bowl, being careful to catch the seeds. I squeeze the lemon into my cupped hand, letting the juice strain through my fingers.
  3. Slowly drizzle in the olive oil and whisk at the same time.
  4. Serve with meat or veggies of your choice. Will keep refrigerated for 1-2 days but is best used fresh because of the herbs.

More recipes that include homemade mayo…

by Mel

“You’re The Top” Tuna Salad
Firecracker Tuna Salad
Tropical Chopped Salad
Fiesta Tuna Salad
Deconstructed Gyros
Creamy Italian Dressing
Southwestern Cumin-Lime Dressing

Lemony Chive Paleo Mayo


mayo2When it comes to mayo, I make no pretense for having the master, doesn’t fail basic recipe (that honor goes to the stellar Mel of The Clothes Make the Girl and Well Fed 2). I’ve only had this method go kaput once because yours truly was too impatient to wait for the ingredients to get all nice and cozy warm at room temperature before I tried to make the mayo emulsion. Oops. Have some patience, and it will all turn out okay. You can also use a stick (immersion) blender but I don’t own one because I’m the clumsiest person on the planet and well, yeah, exposed blades and I don’t mix!
All I did here was use Mel’s basic mayo recipe (here’s a video) and add a few simple ingredients to jazz it up. This went perfect as an accompaniment with my Grain-Free Paleo Zucchini Fritters.
DSC_0077
Ingredients for a batch of Mel’s Mayo:
  • 1 egg
  • 2 Tablespoons lemon juice
  • 1/2 teaspoon dry mustard
  • 1/2 teaspoon salt
  • 1.25 cups of light-tasting olive oil (if it’s not light or extra light in flavor, the finished product will be strong tasting and peppery which most people don’t like)
Ingredients for the Lemony Chive Paleo Mayo:
  • 1/2 cup olive oil mayo from the recipe above
  • 2 Tablespoons chopped chives
  • Zest of 1 lemon
DSC_0085
Directions to make the basic mayo:
  • Please visit Mel’s recipe here (it will open in a new tab so you don’t lose this page). She does a much better job of explaining it than I would.
Directions to make the Lemony Chive Paleo Mayo:
  • Put 1/2 cup of the basic mayo into a bowl.
  • Use a microplane grater to zest the (washed) lemon, and add the zest to the bowl.
  • Add the chopped chives. Stir thoroughly to combine.
  • Add cracked black pepper to taste (optional).

Pina Colada Chicken With Calypso Confetti Cauliflower

http://www.theclothesmakethegirl.com/2009/09/23/dinner-and-a-movie%E2%84%A2-the-emmy-awards-and-pina-colada-chicken-with-calypso-confetti-cauliflower/
Dave and I, after much painful trial and error, have declared Sundays “socializing-free zones,” which means that except for major occasions – like a friend’s recent wedding – we don’t make plans with other humans on Sundays. It’s our day to sleep late, do laundry, cook for the week, taunt the cat about being a skinny-ass Zombie beast, read books, take a nap, sit in the yard and think about nothing… or scrap all of that and just lie in bed with the A/C cranked while watching an entire season of a TV show on DVD.
Once the chores are done, we reward ourselves with Dinner & A Movie™. Our dining room table faces the TV, so we dim the lights and sit side-by-side, just like the Alamo Drafthouse, only Paleo-Zone-friendly and free.
This week, we had Pina Colada Chicken with Calypso Confetti Cauliflower and watched The Emmy Awards. I give the dinner 4 stars. The Emmies get 4 stars for Neal Patrick Harris as host and 2 stars for all the overly-casual, just-rolled-out-of bed hair on Hollywood’s TV elite. (Yay, Jon Cryer! Congratulations on your win. I’ve loved you since No Small Affair and Pretty in Pink, and I always will. Andie should totally have chosen you over Andrew McCarthy (duh) and you may lip sync to “Tenderness” in my presence any time.)

Our Menu
Pina Colada Chicken
Calypso Confetti Cauliflower
Strawberries & Sunbutter
I must give credit where credit is due, before we get down to delicious business. Mark’s Daily Apple pointed to this recipe at Joyful Abode. I swiped the concept and re-worked it to add more veggies and use the ingredients I had in the fridge.
RECIPES
Pina Colada Chicken & Calypso Confetti Cauliflower
This recipe makes enough for 2; easy to double or triple!

Ingredients:
8 oz. grilled chicken (If you don’t have already-grilled chicken you can just dice the chicken and saute it in some olive oil, then set aside.)
1/2 cup unsweetened, crushed pineapple
1/2 cup coconut milk
juice of 1 lime
2 garlic clove, crushed
pinch of cayenne pepper
1/2 cup onion, finely diced
1 green pepper, finely diced
1/2 red pepper, finely diced
1 carrot, grated
2-3 cups grated cauliflower
olive oil or coconut oil for sautéeing
Directions:
1. Make the sauce. Place the coconut milk, pineapple, lime juice, garlic clove, and cayenne, in a medium sauce pan. Heat over medium while you make the rest of the meal.

2. Prep the vegetables & chicken. Dice the peppers and onion to a 1/4-inch; try to make them all the same size so they cook evenly. Shred the carrot with a grater or peeler. Turn the cauliflower to “rice” in a food processor or with a grater; see this link for details. Cut chicken into bite-sized pieces.

This is where things start happening faster. Get ready! Dinner is so close, and it’s really tasty.
3. Cook the vegetables. Put some oil in a saute pan. I used 1 teaspoon for the onions, peppers, and carrot – cook those vegetables until they’re tender and starting to brown. Then I added another 2 teaspoons of oil, the cauliflower, a pretty good sprinkle of salt, and stir-fried the whole thing ’til it was hot and slightly browned.

4. Heat the chicken. I used the microwave. You can also just throw in the chicken on top of the veggies and re-heat it that way.

5. Assemble. Make a bed of Calypso Confetti Cauliflower on a plate, then top with the diced chicken. Remove the sauce from the stove and take a big whiff – it smells heavenly! Pour the sauce over the chicken and vegetables.
6. Pretend you’re wearing this outfit and dig in!
Some delicious alternative additions:

Avocado: It occurred to me after I’d cleaned my plate that this would probably be delish with some diced avocado sprinkled top.
Toasted nuts: Ditto. I realized too late that it would be perfect with crushed toasted pecans or macadamia nuts as the final touch on top.
If you try the avocado or nuts, post to comments and let us know how it is. And if I make this for dinner again tomorrow (which I’m tempted to do), I’ll give you my opinion on the additions.
Special thanks to Dave for taking the photos, for acting as my taste-tester, and for being such a good sport about wearing the ruffled pants.

Just in case you want to print the recipe without the photos, here’s a version you can copy and paste:

Pina Colada Chicken & Calypso Confetti Cauliflower
This recipe makes enough for 2; easy to double or triple!
Ingredients:
8 oz. grilled chicken (If you don’t have already grilled chicken you can just dice the chicken and saute it in some olive oil, then set aside.)
1/2 cup unsweetened, crushed pineapple
1/2 cup coconut milk
juice of 1 lime
2 garlic clove, crushed
pinch of cayenne pepper
1/2 cup onion, finely diced
1 green pepper, finely diced
1/2 red pepper, finely diced
1 carrot, grated
2-3 cups grated cauliflower
olive oil or coconut oil for sautéeing
Directions:
1. Make the sauce. Place the coconut milk, pineapple, lime juice, garlic clove, and cayenne, in a medium sauce pan. Heat over medium while you make the rest of the meal.
2. Prep the vegetables & chicken. Dice the peppers and onion in a 1/4-inch dice; try to make them all the same size so they cook evenly. Shred the carrot with a grater or peeler. Turn the cauliflower to “rice” in a food processor or with a grater; see this link for details. Cut chicken into bite-sized pieces.
This is where things start happening faster. Get ready! Dinner is so close, and it’s really tasty.
3. Cook the vegetables. Put some oil in a saute pan. I used 1 teaspoon for the onions, peppers, and carrot – cook those vegetables until they’re tender and starting to brown. Then I added another 2 teaspoons of oil, the cauliflower, a pretty good sprinkle of salt, and stir-fried the whole thing ’til it was hot and slightly browned.
4. Heat the chicken. I used the microwave. You can also just throw in the chicken on top of the veggies and re-heat it that way.
5. Assemble. Make a bed of Calypso Confetti Cauliflower on a plate, then top with the diced chicken. Remove the sauce from the stove and take a big whiff – it smells heavenly! Pour the sauce over the chicken and vegetables.

Basic Coconut Butter

http://thehealthyfoodie.com/2013/10/17/basic-coconut-butter/

Posted in: , , ,

I know, I’m not giving you much of anything new here.
Chances are you’ve probably seen and read thousands of posts talking about this very subject already: the [very simple] art of making all natural coconut butter at home.
Basic Homemade Coconut Butter | by Sonia! The Healthy Foodie
You may be wondering: if so many people already covered this, why on earth did I choose to give you yet ANOTHER post on the subject?
Because unfortunately, it seems that a lot of people find it very hard, if not darn near impossible, to get their dried coconut to turn into butter. I’m hoping that this post will convince you that, in fact, nothing could be further from the truth!
Making your own coconut butter at home not only is SUPER easy, but it will also save you TONS of money.
Only there is this one fundamental rule that you ABSOLUTELY have to follow, and that is…
YOU NEED TO USE LOTS OF COCONUT!
If you try and make a batch of coconut butter out of a meager cup or two of shredded coconut, all you will accomplish is send it flying off to the sides of the bowl of your food processor as soon as the blades start spinning, which will have you constantly stop the motor to scrape it back down.
Needless to say that this will get you nowhere fast, except maybe on your way for some terrible frustration. So please, trust me on this one: LOTS OF COCONUT is what you need.
Sunblest Unsweetened Shredded Coconut | by Sonia! The Healthy Foodie
Now, since using 
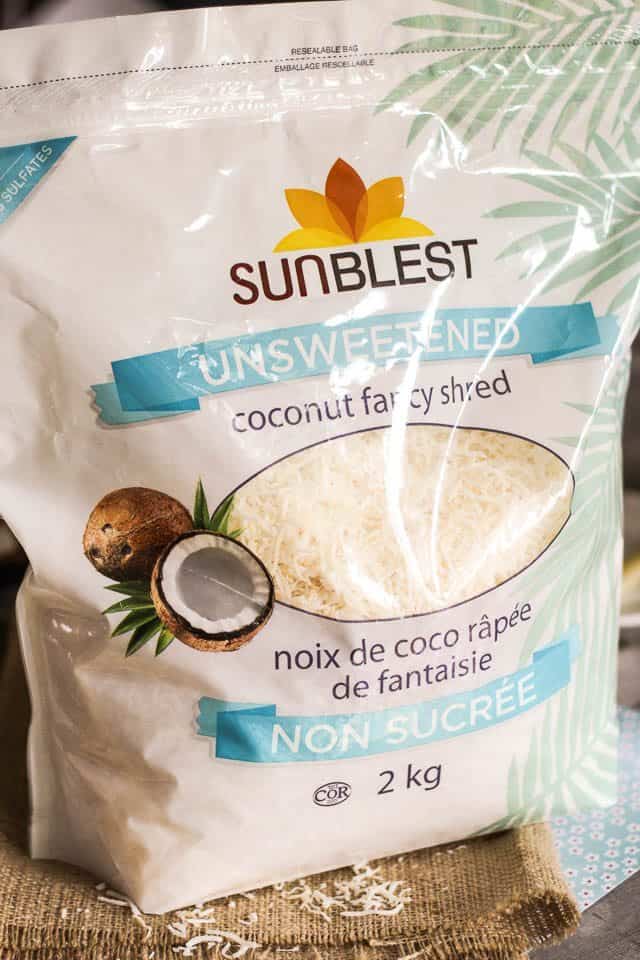
LOTS OF COCONUT is the number one rule, the first thing you need to do is get your hands on a great BIG bag of coconut.
Don’t you go and buy just any coconut, though. Of course, you absolutely want to buy unsweetened, but you also want to make sure that your coconut is free of any additives, namely sulfites or sulfates which are a VERY commonly used as a preservative, at least here in Canada.
So check out the list of ingredients and make sure it lists nothing but one: coconut.
The huge bag you see up there I got at my local COSTCO for a measly $8.99. Not bad, not bad at all. Much, much cheaper than what a 2kg jar of coconut butter would cost you!
Basic Homemade Coconut Butter | by Sonia! The Healthy Foodie
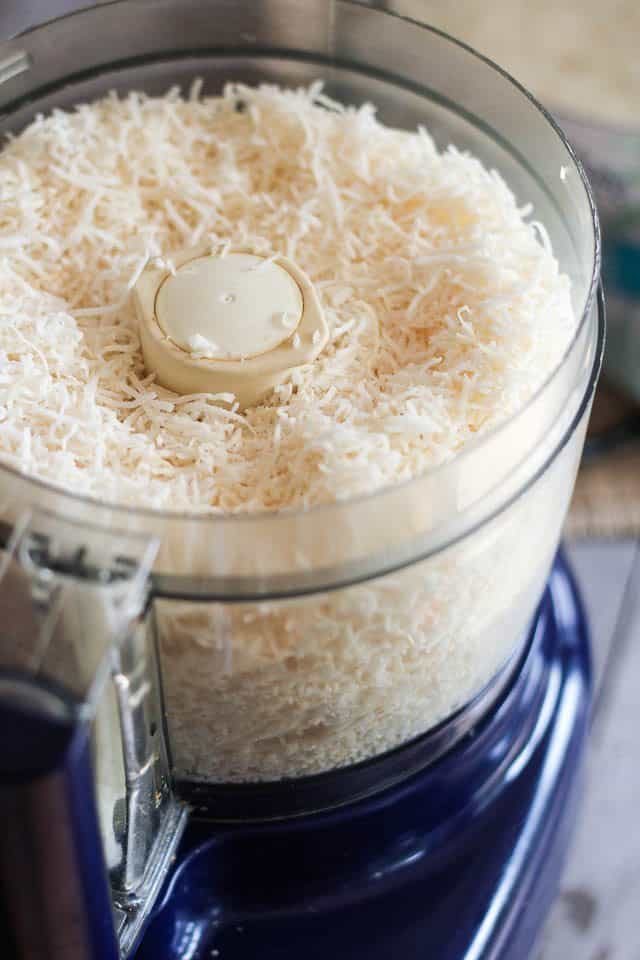
Alright. So you’ve got your coconut. Now you really want to FILL UP that bowl with shredded coconut. And I do mean FILL IT UP.
Don’t worry about adding too much; shredded coconut is a pretty much like spinach: you start with a gigantic, hulk-esque pile of the stuff and end up with a puny, insignificant spoonful or two…
For this particular batch, I started with 6 cups of shredded coconut, which yielded a little bit less than 2 cups of the finished product.
Basic Homemade Coconut Butter | by Sonia! The Healthy Foodie
See? Look at her spin!
By really filling that bowl all the way to the top, the coconut gets to spin ’round and ’round and ’round, and you won’t really ever need to scrape the sides to get it back down to where the action is.
Not only that, but the process will happen quite rapidly, too.
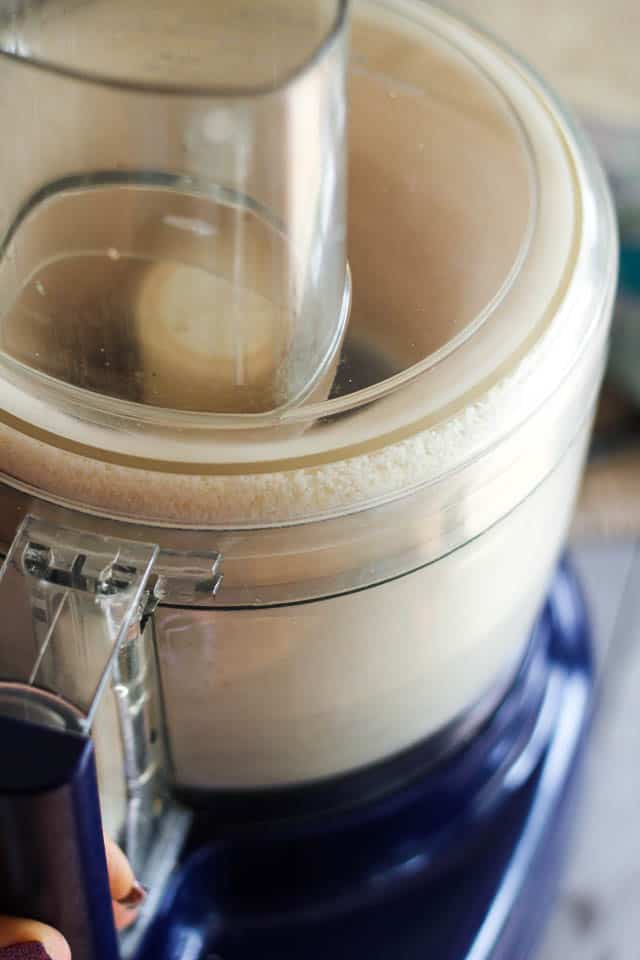
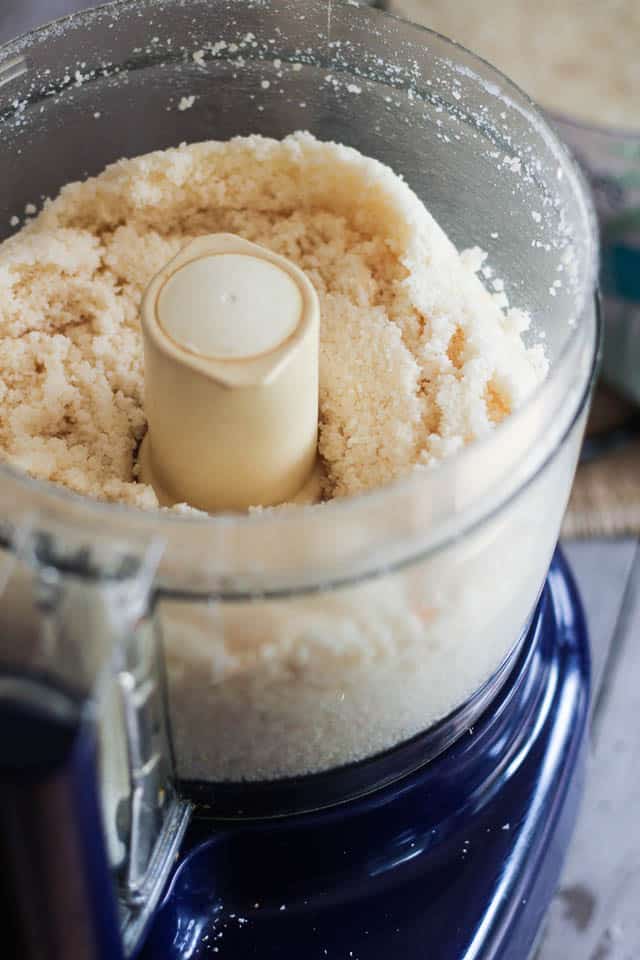
To give you an idea of how fast this goes, I stopped the motor and took a picture every 30 seconds or so…
Basic Homemade Coconut Butter | by Sonia! The Healthy Foodie
30 seconds in, the load has already reduced by almost half…
Smelling good already!
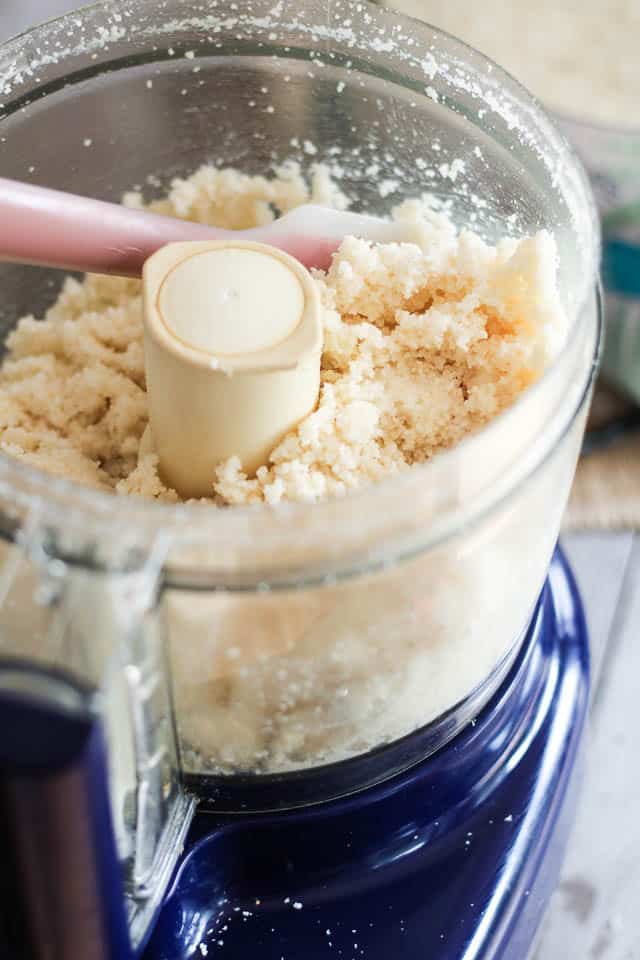
Basic Homemade Coconut Butter | by Sonia! The Healthy Foodie
Another 30 seconds.
In terms of volume, we’re pretty much at the same place, but the texture has gotten a bit finer and “wetter”, too.
Let’s keep going…
(Oh, and why not scrape the sides a little while we’re at it? Just because, scraping the sides is fun when you don’t have to do it every 10 seconds! )
Basic Homemade Coconut Butter | by Sonia! The Healthy Foodie
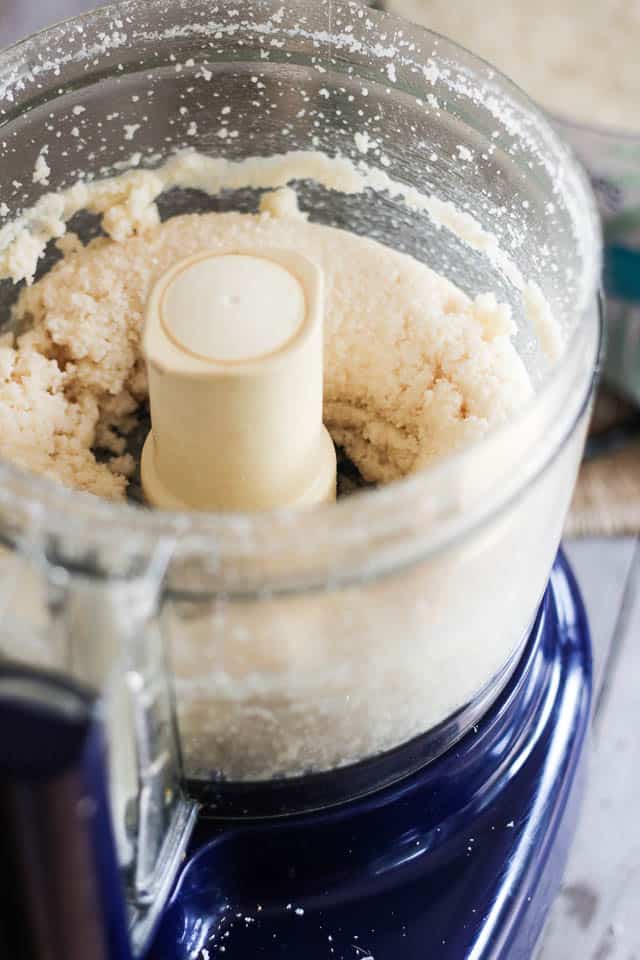
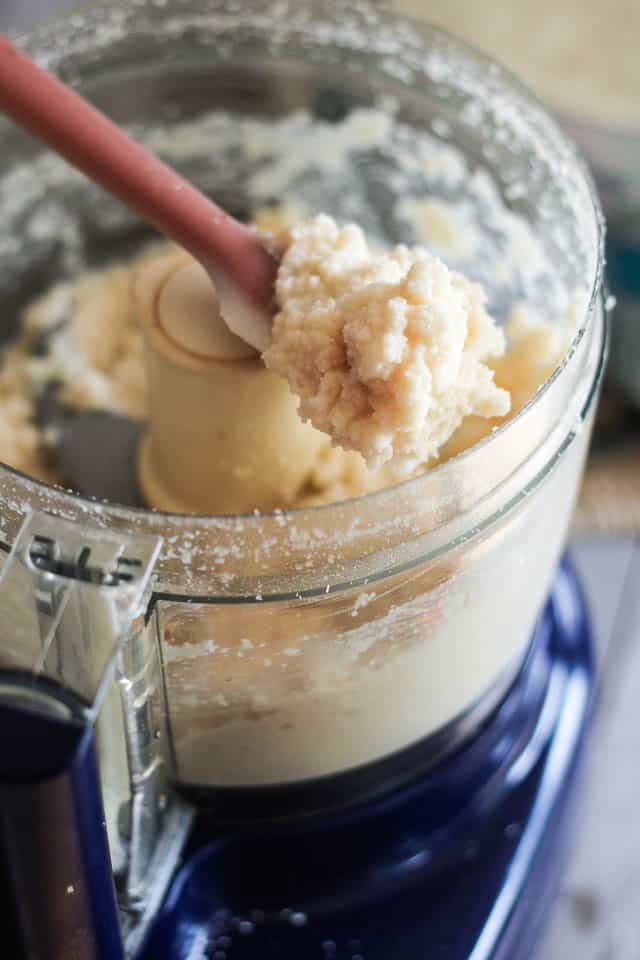
Another 30 seconds in, the coconut has reduced in volume quite a bit again and is starting to get a nice creamy butter consistency.
I think we need to let her rip some more.
Basic Homemade Coconut Butter | by Sonia! The Healthy Foodie
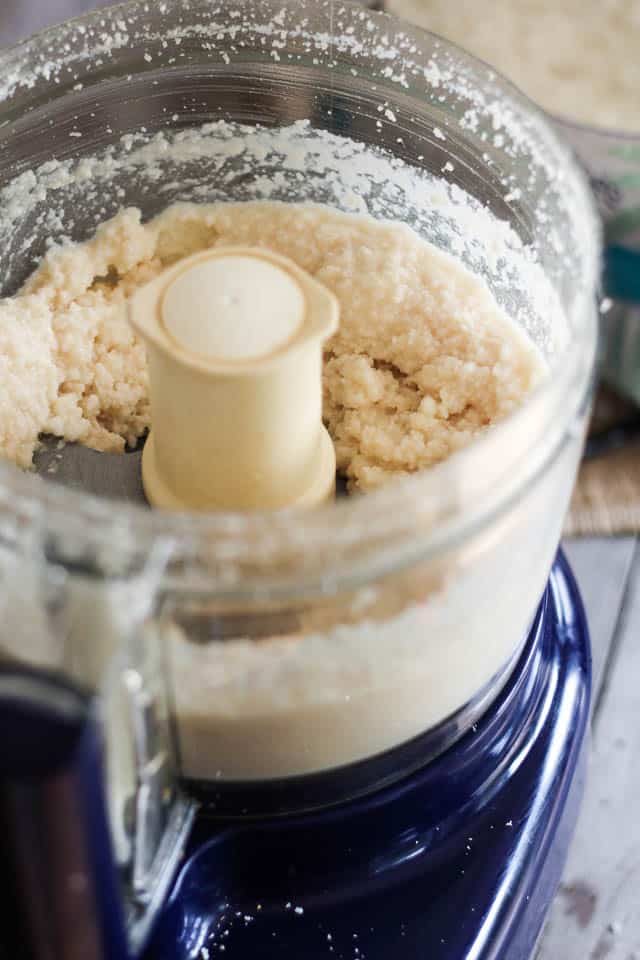
Getting there, big time.
The aroma is intoxicating. I want to stuff my face in that bowl now!
Start the motor once again…
Basic Homemade Coconut Butter | by Sonia! The Healthy Foodie
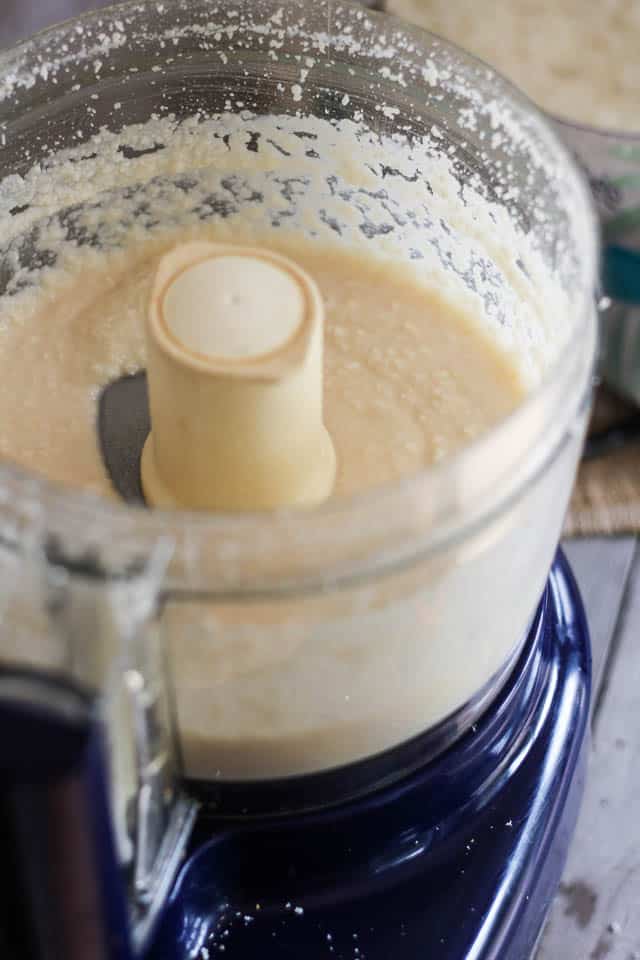
Another 30 seconds down and I think the consistency is getting just about right, now.
But I like my coconut butter really nice and creamy, so I’ll give it a few more seconds…
Basic Homemade Coconut Butter | by Sonia! The Healthy Foodie
Ahhhhh, there we have it!
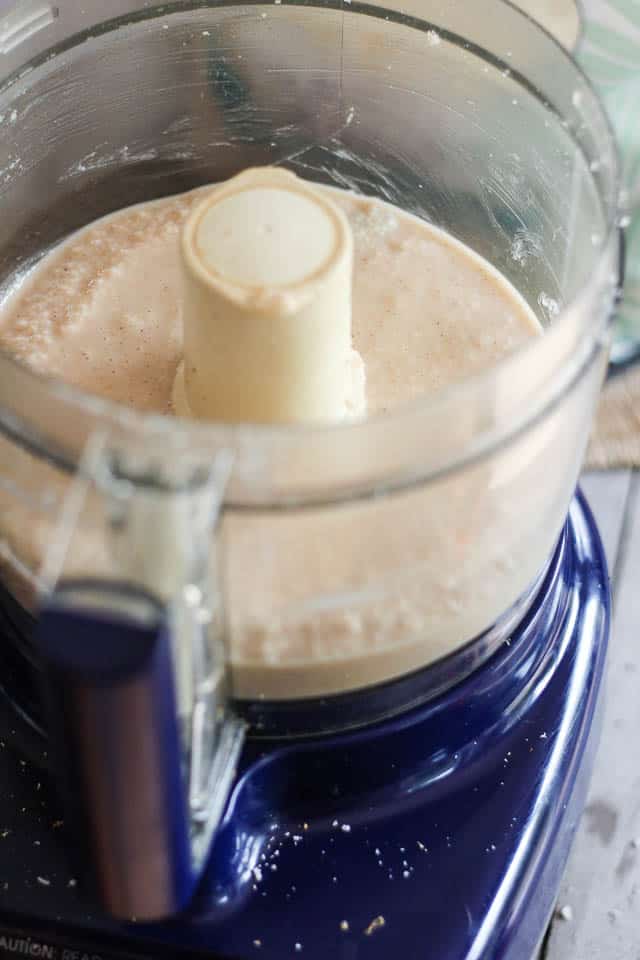
At this point, the coconut butter was creamy enough for my taste.
I decided to add a generous pinch of salt, a generous pinch of true Ceylon Cinnamon, a few gratings of fresh nutmeg and a splash of home made pure vanilla extract. Of course, adding any of these things is completely optional, but I find it gives so much depth and richness to the already formidable flavor of the coconut butter.
Basic Homemade Coconut Butter | by Sonia! The Healthy Foodie
And there we have it.
See what I mean by “The Shrinking Spinach Syndrome”? From that whole bowlful that we had at the beginning, we are now down to a very thin (but delicious) layer at the bottom of the bowl.
Now imagine if we’d tried working with 30% of that. It would only have made our lives miserable, and chances are, we wouldn’t  be licking spoonfuls and spatulafuls of warm, creamy, fresh coconut butter at this time!
Basic Homemade Coconut Butter | by Sonia! The Healthy Foodie
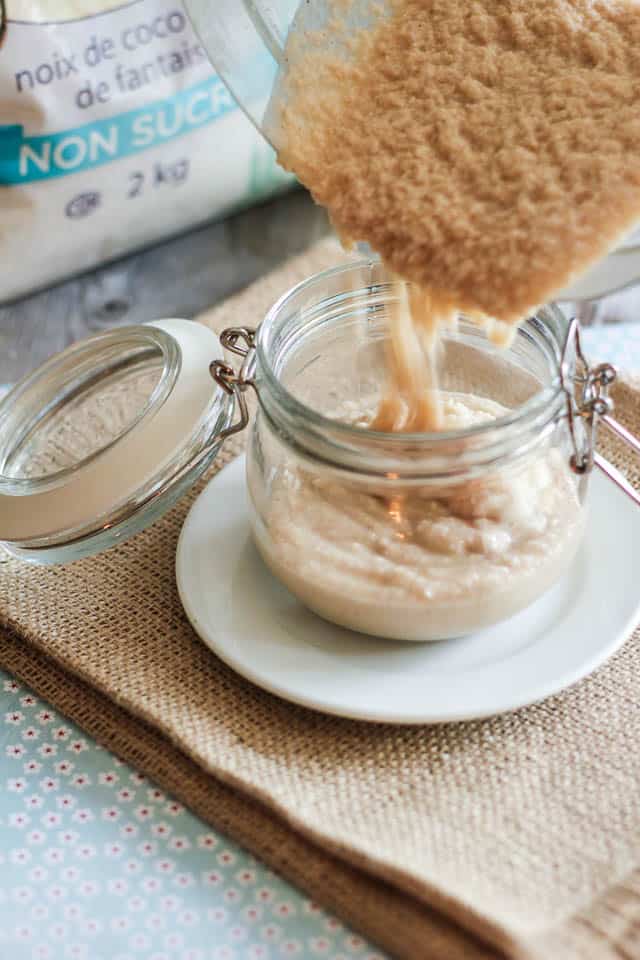
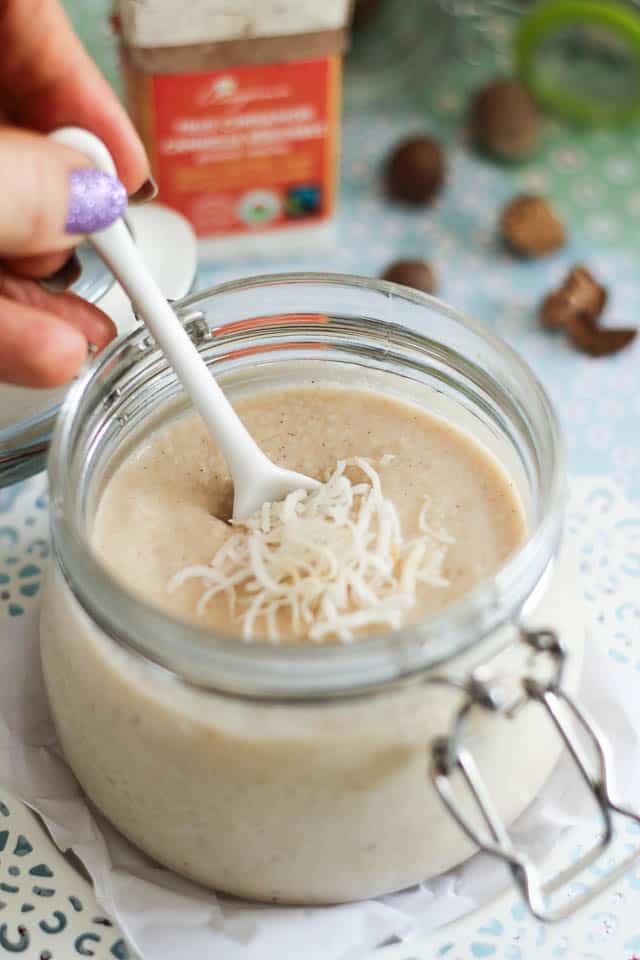
Time to transfer the fruit of our labor to an airtight container.
At this point, the coconut butter will be fairly liquid because it’s gotten pretty warm from all that blade spinning action.
Just like coconut oil, though, it will solidify even at room temperature. Just give it a day or so to rest, and the magic will happen.
Basic Homemade Coconut Butter | by Sonia! The Healthy Foodie
The final consistency of your coconut butter will highly depend on the temperature that reigns inside your home and cupboards.
In the wintertime (or if you keep it in the fridge) it tends to become somewhat hard and crumbly.
In the summertime, however, the coconut butter is very likely to keep a luscious, creamy dreamy spoonable consistency.
That, my friends, could be highly dangerous…
Basic Homemade Coconut Butter | by Sonia! The Healthy Foodie
See how easily that spoon goes in?
Oh, be still my heart. Someone please take this jar away from me… I am getting weak at the knees!